Shipping your iOS app to Store
Submitting your app to the Apple Store isn’t as simple as pressing a “magic” button then it does everything, but it’s not as complicated as you think either. It’s maybe your first time launching your first app, and you don’t have a chance to get familiar with the submitting process before. This step-by-step tutorial will show you the main flow to submit apps from zero to a hero. Kindly note that you need to have a Paid Developer Account to get it done.
Jump in!
Certificates, app Ids and provisioning profiles
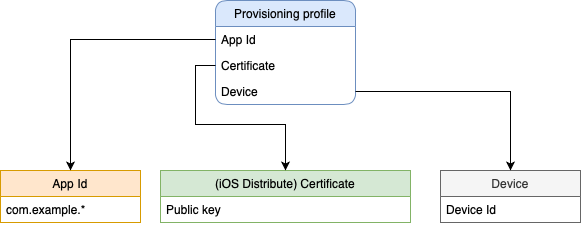
In other to submit your app to App Store, you need to understand what certificates, app IDs and provisioning profiles are. Basically, A distribution certificate identifies your team/organization within a distribution provisioning profile and allows you to submit your app to the Apple App Store. The following image describes the relationship between them.
Create a Distribution Certificate
- On your Mac, Open Key Chain Access app.
- Go to Certificate Assistant > Request a Certificate From a Certificate Authority.

- Fill in your email to the email box.

The Keychain Access will create a private key, which is stored in the keychain, and a .certSigningRequest file which will be uploaded to Apple. Apple will issue a certificate for you based on the .certSigningRequest. The Certificate contains the public key. After that, you can download the file and open it. The public key will be pushed to the Keychain and paired with the private key to make the “Code Signing Identify”.
Just so you know what is CSR
A CSR or Certificate Signing request is a block of encoded text that is given to a Certificate Authority when applying for an SSL Certificate. It is usually generated on the server where the certificate will be installed and contains information that will be included in the certificate such as the organization name, common name (domain name), locality, and country. It also contains the public key that will be included in the certificate. A private key is usually created at the same time that you create the CSR, making a key pair.
- After having the
.certSigningRequestfile, go to the Apple developer page, sign in to your Apple Account > Certificates, Identifiers & Profiles > Press the “+” button to create a new certification > Remember to select the “iOS Distribution (App Store and Ad Hoc)” option.

- Next, select to upload your
.certSigningRequestfile you just created at the step 3.

- Finally, you now can download the Certificate file to your Mac, open it and the key will be pushed to the keychain automatically.

That’s all for creating a Distribution Certificate, let’s move on to the next step, create your app id.
Create App Id
Press the “+” button on the page “All Identifiers”

Fill in your app information, including your bundle Id. Please note that this bundle id must match your bundle id in XCode. You can also use wildcard pattern to define bundle Id for more than one app Ids.

Create Provisioning Profile
Press the “+” button on the page “Profiles”, then select “App Store” option.

Select your app Id that you just created in the previous step, Create App Id.

Select your Certificate that you just created in the previous step, Create a Distribution Certificate

Now you have a profile that links your Certificate and your app Ids. Download this file and open it. The Provisioning Profiles will be pushed to XCode automatically.
Uploading
It’s time to upload your app to Store.
Let’s back to your project, from the Top Tool Bar > Product > Archive, XCode will rebuild your project. After that, the XCode Organizer will launch and show all archives you’ve created in the past.
Select the current build, then click on “Distribute App” in the right-hand panel.

The next window allows you to select your credentials including the Distribution Certificate and the Provisioning Profiles you created in the first section. Finally, press the upload button, XCode will do the rest for you.

An email will be sent to notify you right after Apple completes the processing process, it usually takes some minutes.
Your app has been successfully uploaded to your iTunes Profile, let’s go to the final step.
Submiting
Navigate to App Store Connect, select “My Apps”. you will see your app appear on the page.

You need to prepare the following information to fill in on these pages:
- App Name, Privacy Policy URL, Age Rating, Category.
- Screenshot in different sizes: This might take your time the most, your screenshots need to meet Apple requirements at Screenshot specifications. Kindly note that users will see these screenshots related to their current devices, so make sure your photos are fancy and extractive as most as you can. Fastlane also supports take screenshots automatically, you can find the document if you’re interesting. Fastlane tools can automate this process making it fast, and consistent while giving you beautiful results!
- Version description, keywords, support URL.
- If your app requires sign in, fill in account information with username and password.
- App notes: Some important notes you want to send the previewer to make sure it works properly. (e.g we strongly recommend using the service with a Wifi connection for best quality)
- Attachment: It’s best to have a short demo of your app.
- Contact information: If there are any issues, Apple will contact you via this information.
You’re done. Now precess the “Submit” button to start the reviewing process.
Reviewing process
Your reviewing process takes some time to complete, it may be a couple of days to couple weeks depends on your app category, features, and … the reviewer.
If your app violates Apple rules such as using unapproved private APIs, lack of permission description, crashing or poor performance, it will get rejected. In the end, we have to accept that Apple has the final word on allowing anything into the App Store. Just because you think your app is great does not mean that Apple will allow it into App Store. I myself experienced this strickly-randomly-emotionally process when submitting my application. The first submission went smoothly without any troubles. The second one, which is updated some UI, got rejected because Apple thinks my app contains a feature that is not allowed in the App Store. With many emails and phone calls, I finally had to remove this feature from my app. (?!)
Final words
In this post, I guided you on how to submit your app to Store in a very detailed step. Hope this post saves your time in delivering your amazing apps to users. Can’t wait.
In next post, I will show your steps to upload your app to Google Play.
Happy coding.