Advanced iOS Concurrency: Async Operations [2]

In the previous post, Advanced iOS Concurrency: Operations, we walked through the Operation concepts on iOS and made a demo application that fetches some posts of mine. After downloading the cover images, they will be applied to a simple filter, then be displayed in a table view. The application, however, has not been completed yet. There’s something that went wrong with our app making the app did not show downloaded images properly. In this tutorial, we will continue where we left off.
Get ready!
Operation life cycle
To find out why our app did not function properly, let’s review the current source code
1 | class DownloadImageOperation: Operation { |
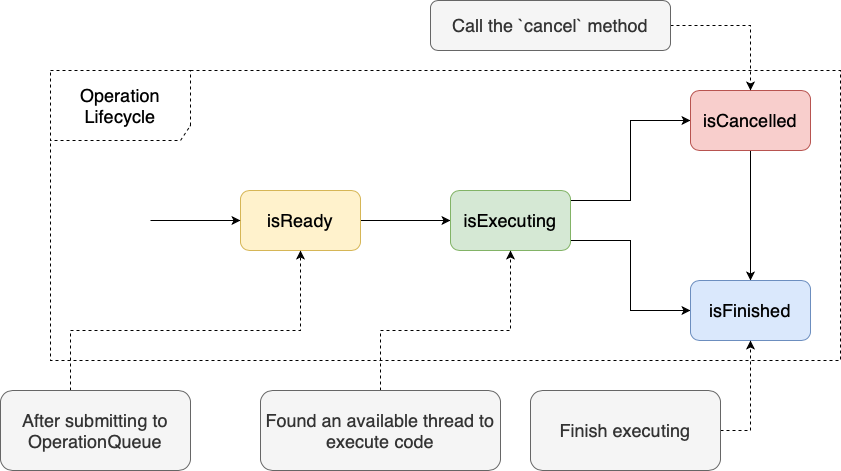
The following image describes the changes in states of operations.
When the main method gets called, it will execute our asynchronous task and then exit immediately making the state of the operation switch to isFinish. At that point, our asynchronous task actually has not completed yet.
Currently, we’re calling to download an image inside the main method of the Operation. The root cause is related to the Operation Life Cycle itself. Thus, to support asynchronous operations in our app, we need to manually manage states of operations.
Key-Value Observing
Before implementing our custom Async Operation class, we need to learn a new concept first: KVO. I assume that you’ve not heard about this concept so we will have a quick look at it first.
Key-Value Observing, aka KVO, is one of the techniques for observing the state changes of an object in Objective-C and Swift. Whenever the value of the observed properties changed, the observing block of code will execute. At the heart of KVO, the main concept is based on the Observer Pattern.
Swift classes that are inherited from NSObject class have methods to allow other objects to observe their properties.
Key-value observing provides a mechanism that allows objects to be notified of changes to specific properties of other objects. It is particularly useful for communication between model and controller layers in an application.
Let’s create a Playground to test it.
1 | class CreditCard: NSObject { |
Here, I define two classes: CreditCard and Person. A Person object holds a CreditCard object as a property. What I want is whenever the number property of the credit card gets changed, the person will be notified. Here is KVO comes.
Run the above code in the playground, you should see the log New number is \(newNumber) print out on your console.
Why should we need to know about KVO? The answer is because the Operation class uses KVO notification. Whenever the state of Operation changes, a KVO notification will be sent.
Without KVO notifications, the OperationQueue won’t be able to observe the state of our operations so that it can not get updated correctly. Thus, when we manage the state of operation by ourselves, we must ensure those KVO notifications are sent properly.
Async Operation
Let’s create AsyncOperation class inherited from the Operation class.
1 | class AsyncOperation: Operation { |
Next, We declare a property to keep track the state of the object.
1 | var state = State.ready { |
The Operation base class needs to know the changes of both the old state and new state.
Take a specified case as an example, the state currently is ready, then we set the state to executing. There are 4 KVO notifications should be sent:
- Firstly, notify the willChangeValue for
isReady. - Then. notify the willChangeValue for
executing. - After that, notfiy the willChange for
isReady. - Finally, notfiy the willChange for
executing.
After that, We override the properties of states.
1 | override var isReady: Bool { |
It’s all for managing the state of Async Operation class.
When adding an operation to an operation queue, the start method is what gets called first. then it will call the main method of the operation executing the main block of code you have assigned to the operation.
1 | override func start() { |
Remember when I mentioned that Operation has killer features that make it surpass GDC? The first one is dependencies and the other one is the capability of canceling a running operation. It’s very useful in a case where we want to stop operations that are irrelevant at a certain time. For example, to cancel downloading data when the user scrolls the table making some cells disappear.
Let’s add this feature to our Async Operation class.
First, we need to modify the start method to check the isCancelled property before actually calling the main method.
1 | override func start() { |
And then override the cancel method to update the state to finished
1 | override func cancel() { |
At this point, we’ve finished implementing our Async Operation class. It’s time to mix everything together in our app.
Adding this all together
Because the DownloadImageOperation class executes asynchronously, we can not set Operation class as its base class, we now set AsyncOperation instead. Kindly note that to support canceling in DownloadImageOperation class, we will keep the return value of creating a data task as a property of this class so that we can cancel this URLSessionDataTask later.
The DownloadImageOperation class will look like below.
1 | class DownloadImageOperation: AsyncOperation { |
Let’s back to our main ViewController. To cancel the running operations, we first add new dictionary as a property of ViewController which tracks all running operations for each table view cell at a corresponding index path.
1 | private var operations: [IndexPath: [Operation]] = [:] |
Inside the func tableView(_ tableView:cellForRowAt indexPath:) delegate, after adding two operations to the operation queue, we will also add them to the operations dictionary for tracking. Additionally, if there is an operation for this index path, cancel it before holding the new one.
1 | if let existingOperations = operations[indexPath] { |
When the user scrolls the table, some cells disappear and the delegate func tableView(_ tableView:didEndDisplaying cell:indexPath:) gets called. At that point, we’ll also cancel the running operations for that cell ensuring that only operations of visible cells are executing.
1 | func tableView(_ tableView: UITableView, didEndDisplaying cell: UITableViewCell, forRowAt indexPath: IndexPath) { |

Now, you should see the app now works properly. Additionally, by starting and canceling the operations wisely, we’re saving the network traffic as well as reduce the battery consumption. Those things can make our app run faster.
Conclusion
There are some benefits of Operation over GCD that keep our source code maintainable and reusable.
The last to mention, please careful when using Operation or GCD because Concurrency sometimes introduces bugs that are not always transparent to find and fix. In Clean Code Book, Robert C. Martin states some important points when working with multiple threads
There are some basic definitions we should know when we talk about concurrency and threads: Bound resources, mutual exclusion, starvation, deadlock, and livelock.
Concurrency does not always improve performance. It sometimes incurs some overhead and bugs come from it are not usually repeatable.
Limit the access of the data that is shared between more than two threads. Use copies of data if there is a chance.
Keep the synchronized sections as small as possible because Locks create delays and add overhead. They are expensive.
Multithreaded code behaves differently in different environments: Run tests in every potential deployment environment.
You can find the final project via the link
Thank you for reading.
References
- Chapter 6: Operations, Concurrency By Tutorials - Multithreading in Swift with GCD and Operations, Raywenderlich,
- Chapter 7: Concurrency and Multitasking, iOS 8 Swift Programming Cookbook, O’Reilly.