Best practice: Advanced BLE scanning process on iOS

iOS developers are building applications that play both roles Peripheral and Central to exchange data with other copies apps. The data can be exchange a small of information via BLE packets or the signal strength indicator (RSSI) value from one to the others. However, keeping the app last forever in the foreground is impossible. Sooner or later, the app will enter to background mode by the user and finally will be suspended by the system depending on RAM available, power consumption and other factors. Thus, understanding the procedure of advertising and scanning on iOS devices helps you to build good applications that fit your expectations.
At the end of this tutorial, we will build a simple application that acts as both a scanner and an advertiser. When two applications find each other, they will write a log record for analysis. Depending on the results, we will find out how effective our application is using Core Bluetooth.
Let’s switch the gear!
Foundational knowledge
According to the Getting Started With Bluetooth Low Energy book, the two main purposes of advertising packets are:
- To broadcast data for applications.
- To discover slaves and to connect them.
The maximum size of payload each advertising packet is 31 bytes, along with the header information. Every elapsed interval, which ranges from 20ms to 10.24s, advertising packets are broadcasted blindly to notify its presence to other devices or applications. There are two types of scanning approaches:
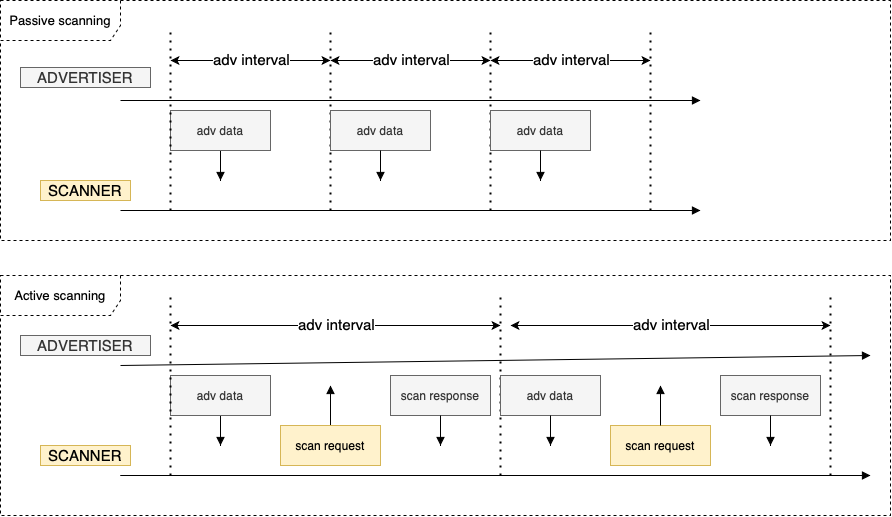
- Passive Scanning: Scanners simply receives advertising packets without any further actions.
- Active Scanning: After receiving an advertising packet, the scanner performs a Scanning Request packet to the advertiser. After receiving the Scanning Request, the advertiser responds with a Scanning Response packet which allows the advertises to send extra data (Extra 31 bytes) to the scanner.

To classify advertising packet types, we rely on three properties: connectability, scannability, and directability
| Adv packet type | Connectability: Determines if a scanner can make a connection or not | Scannability: Determines if a scanner can issue a scan request or not | Directability: Determines if this packet is targeted at any particular scanners or not. |
|---|---|---|---|
| ADV_IND | Yes | Yes | No |
| ADV_DIRECT_IND | Yes | No | Yes |
| ADV_NONCONN_IND | No | No | No |
| ADV_SCAN_IND | No | Yes | No |
There are a lot more advanced topics that described in more detail in the Getting Started With Bluetooth Low Energy book, such as how data is organized in BLE devices and how to communicate with existing hardware, etc. If you want to know more, please refer to the book.
Because of the scope of this post, understanding of the advertising process is good enough for us to move to the next section.
Scanning and advertising on iOS
Setting up the advertiser - Peripheral
We’re going to reuse my previous repo allowing an ios phone advertises as a peripheral using Core Bluetooth.
First, I will generate 5 UUIDs as the services of the advertiser (Peripheral).
1 | let kServiceUUID1 = "1FA2FD8A-17E0-4D3B-AF45-305DA6130E39" |
Next, I will create a list of CBMutableService and then add them to the CBPeripheralManager object.
1 | services.forEach { (each) in |
Finally, we start advertising the peripheral when its state gets ready.
1 | self.peripheralManager.startAdvertising([CBAdvertisementDataLocalNameKey: "uynguyen", |
As the above code gets executed, we will see the following log are printed.
1 | Add service 1FA2FD8A-17E0-4D3B-AF45-305DA6130E39 Succeeded |
Setting the scanner - Central
The next step is to set up our Central Manage - the scanner. As you might know from my previous tutorial, the code to scan nearby devices is quite simple.
1 | private func startScanning() { |
- The
nilvalue we pass towithServicesparam indicates that we will scan all nearby devices without specifying service uuids. - The
CBCentralManagerScanOptionAllowDuplicatesKeyoption specifies the scan should run without duplicate filtering.
Once the central discover a peripheral, we will print its info including the local name and the CBAdvertisementDataServiceUUIDsKey value in the advertising packet.
1 | public func centralManager(_ central: CBCentralManager, didDiscover peripheral: CBPeripheral, advertisementData: [String : Any], rssi RSSI: NSNumber) { |
Let’s build and run the project,
1 | Did found peripheral name: Optional("Uy Nguyen iPad") |
Looking at the log, can you spot what’s going wrong? There is a problem with the advertising packet: the CBAdvertisementDataServiceUUIDsKey value contains only 1 service, where are the other services from 2 to 5?
Let’s print out full advertising packet to see what it contains.
1 | ["kCBAdvDataServiceUUIDs": <__NSArrayM 0x283460630>( |
Still no luck, we can not find the other services from "2FA2FD8A-17E0-4D3B-AF45-305DA6130E39" to "5FA2FD8A-17E0-4D3B-AF45-305DA6130E39".
Finding problems
It turns out the advertising packet the Central receive depends on how we call scanForPeripherals method.
If we change param withServices to an array of our service from "1FA2FD8A-17E0-4D3B-AF45-305DA6130E39" to "5FA2FD8A-17E0-4D3B-AF45-305DA6130E39" explicitly, we will see the differences.
1 | private func startScanning() { |
Here is the log that comes to.
1 | ["kCBAdvDataIsConnectable": 1, "kCBAdvDataServiceUUIDs": <__NSArrayM 0x280708750>( |
Now, we can see the new value contained inside the advertising packet, the kCBAdvDataHashedServiceUUIDs. But what is it?
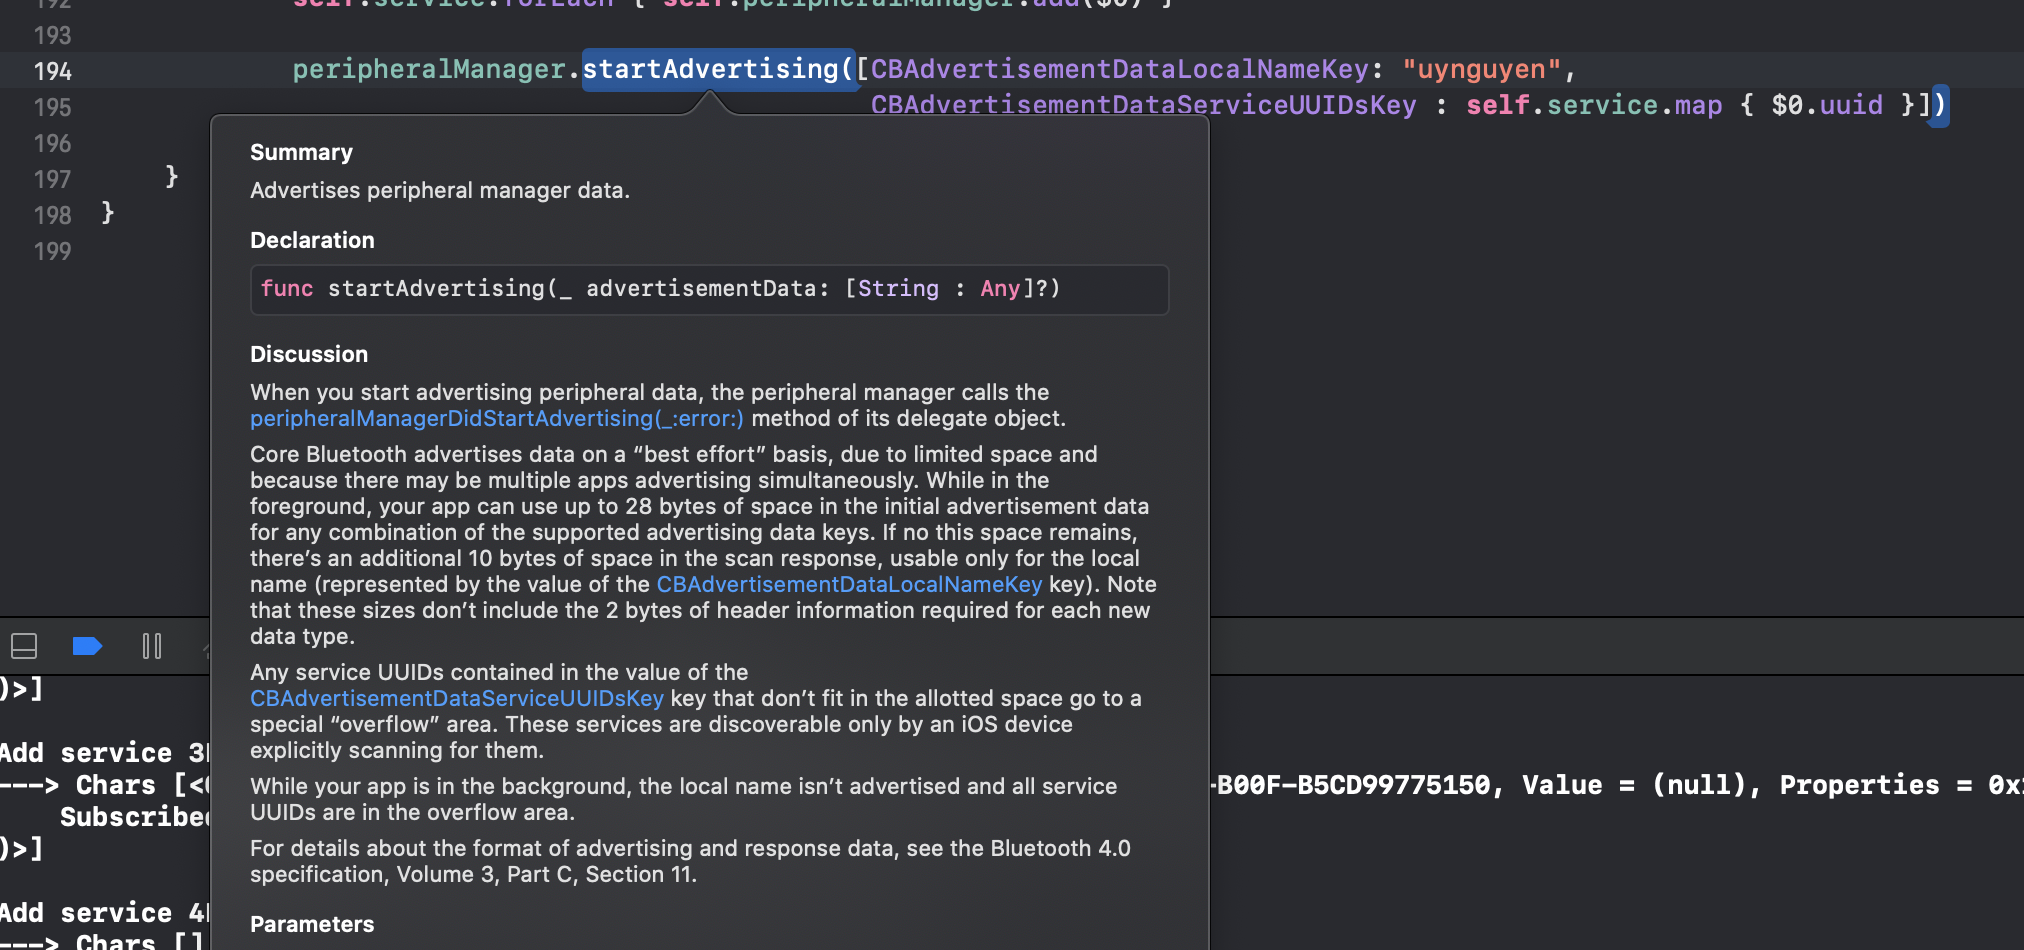
Let’s back to the Peripheral side, if you look closer to the definition of the advertising method of Peripheral object, you might know what it actually is.

In short, when you make an iPhone advertise as a peripheral, if there is no space for any services UUIDs contained in the value of CBAdvertisementDataServiceUUIDsKey, these services will be moved to another space called overflow area.
Another term, T_T What does exactly the overflow area mean?
Basically, the overflow area is placed in the scan response packet. These service uuids are hashed by Apple alg and are discovered only by an iOS device explicitly scanning for them. In our case, because we pass our service uuids from 1F to 5F when start scanning, we will get this kCBAdvDataHashedServiceUUIDs value in the advertising packets.
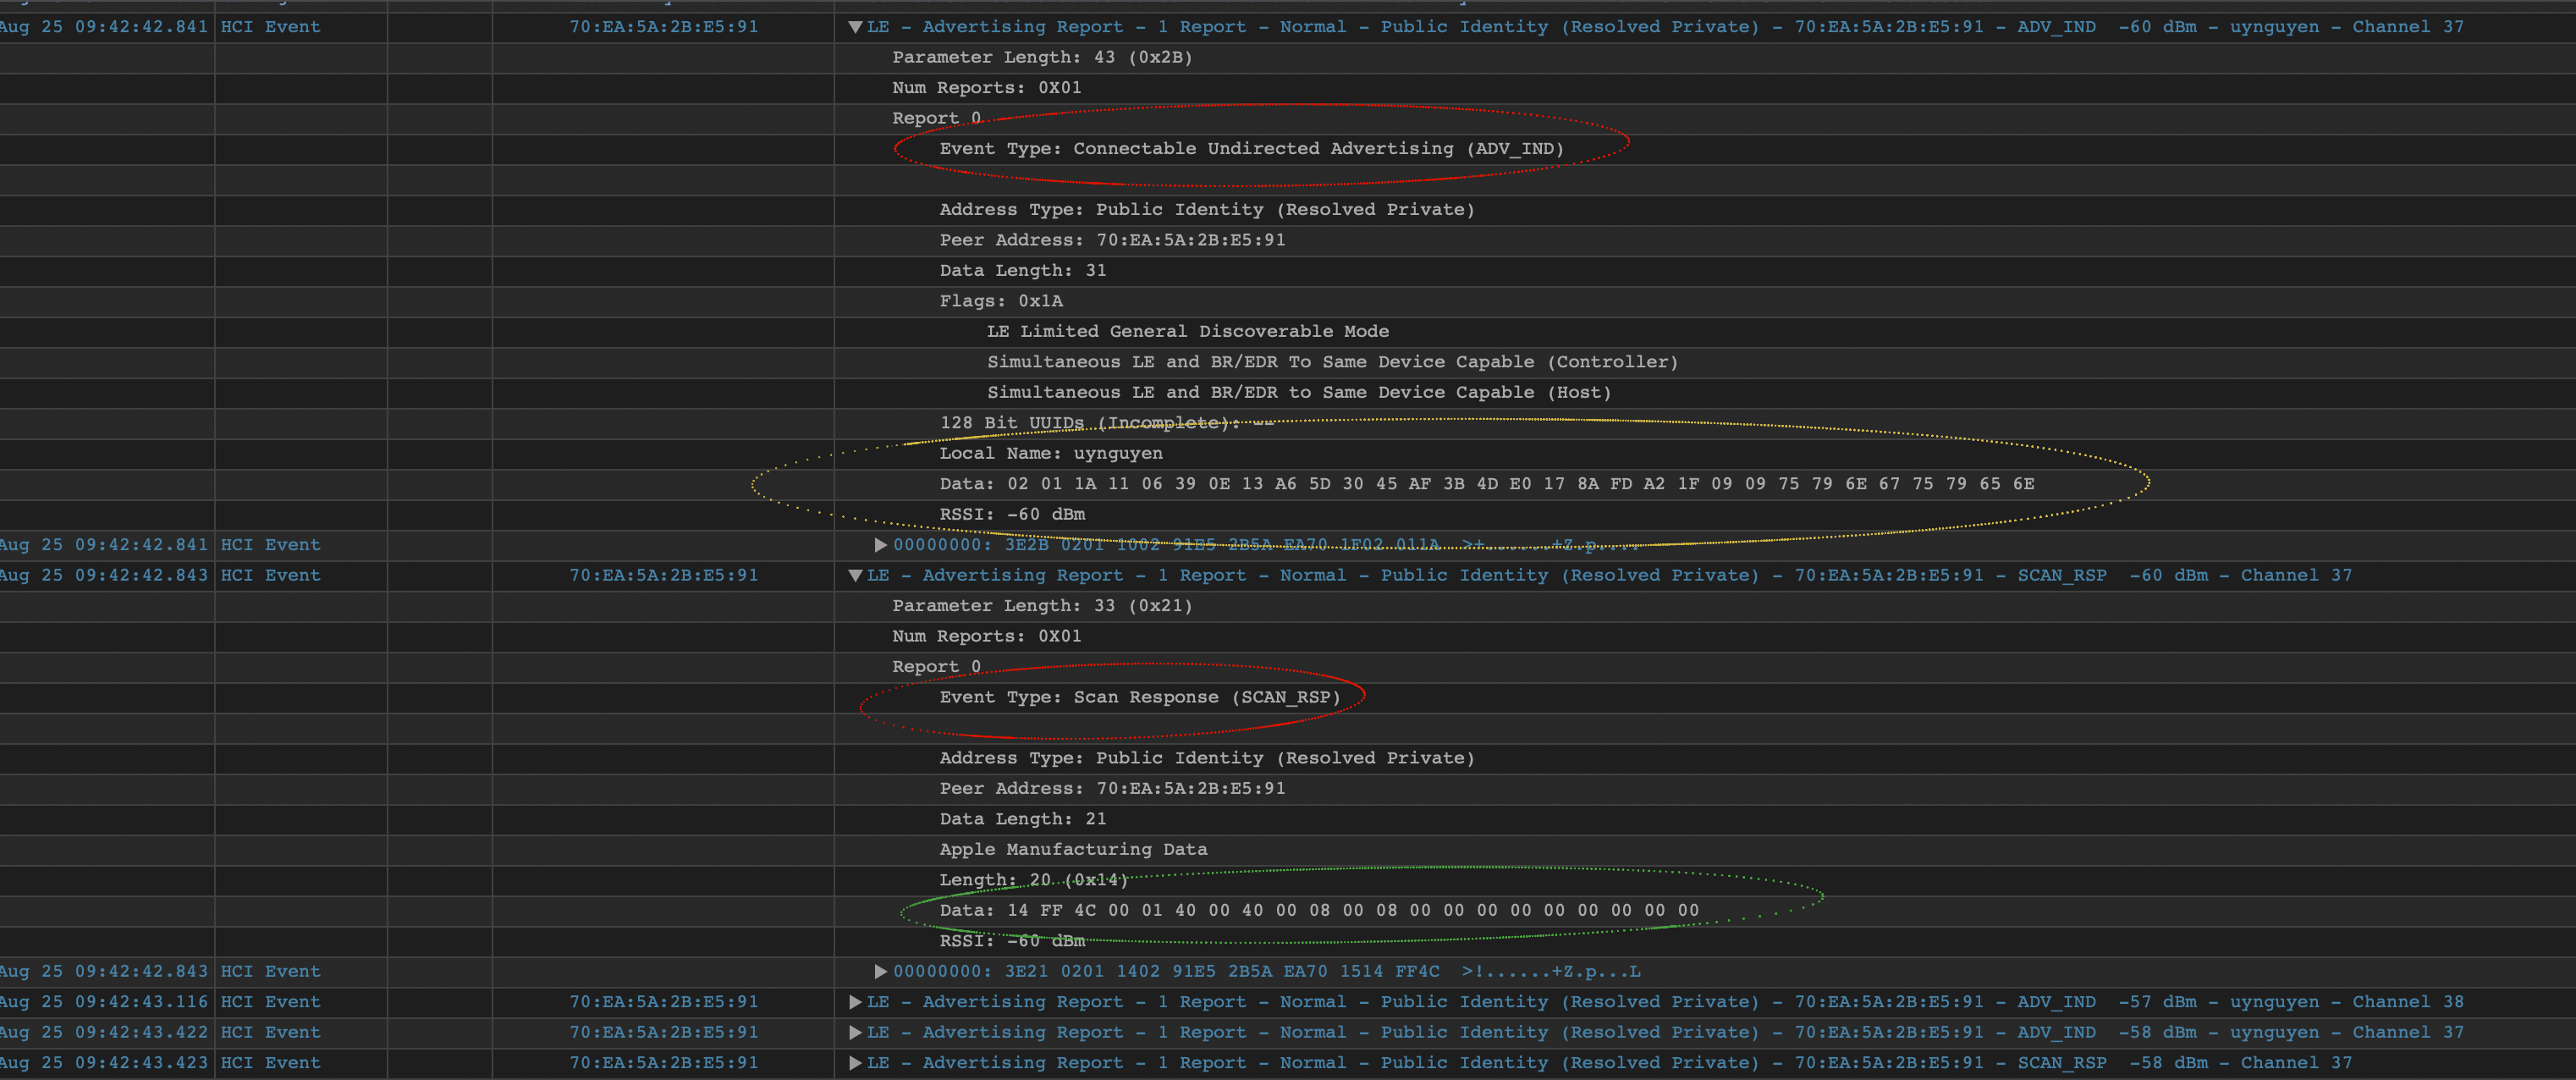
To verify this statement, I use a tool introduced by Apple for BLE debugging - (A New Way to Debug iOS Bluetooth Applications), to grab the advertising packet from our Peripheral for analyzing.
And here is the result

- Advertising packet type:
ADV_IND, which means the scanner can make a connection to it; and a scanner can issue a scan request; and its packets do not target at any particular scanners. - The yellow box is the advertising data: (Data: 02 01 1A 11 06 39 0E 13 A6 5D 30 45 AF 3B 4D E0 17 8A FD A2 1F 09 09 75 79 6E 67 75 79 65 6E), length = 31 bytes; it contains
CBAdvertisementDataLocalName(75 79 6E 67 75 79 65 6E > “uynguyen”) and our first service uuid 1F A2 FD 8A 17 E0 4D 3B AF 45 30 5D A6 13 0E 39 (39 0E 13 A6 5D 30 45 AF 3B 4D E0 17 8A FD A2 1F). - The scan response packet (SCAN_RSP) contains the other info that the advertising packet is not enough length to carry on. In our case, it contains the other services from 2F to 5F. Understanding this packet is quite complex to put in this tutorial so I will skip explaining it for now. I have another tutorial working on this packet later.
In conclusion, what we have found here is: Advertising, while the app is in background, performs differently than when it is in the foreground.
CBAdvertisementDataLocalNameKeyis ignored.- All service UUIDs contained in the value of the CBAdvertisementDataServiceUUIDsKey advertisement key are placed in a special “overflow” area; they can be discovered only by an iOS device that is explicitly scanning for them.
Testing
The table below summarizes what we have investigated.
1 | * YES means the Central is able to find the Peripheral. |
Case 1 - Both Peripheral and Central’s screens turn on
| \ | Peripheral Background | Peripheral Foreground |
|---|---|---|
| Central Background | Yes | Yes |
| Central Foreground | Yes | Yes |
Case 2 - Peripheral’s screen turn off (locked), Central’s screen turn on
| \ | Peripheral Background | Peripheral Foreground |
|---|---|---|
| Central Background | Yes | Yes |
| Central Foreground | Yes | Yes |
Case 3 - Central’s screen turn off (locked), Peripheral’s screen turn on
| \ | Peripheral Background | Peripheral Foreground |
|---|---|---|
| Central Background | No | No |
| Central Foreground | No | No |
Case 4 - Both Peripheral and Central’s screens turn off (locked)
| \ | Peripheral Background | Peripheral Foreground |
|---|---|---|
| Central Background | No | No |
| Central Foreground | No | No |
From the above experiments, regardless of the state of the device playing Peripheral role, the screen of the device playing Central mode must turn on so that it can scan nearby peripherals. In other words, if we’re building an application that allows an iOS device to discover other nearby iOS devices, we have to run both Central and Peripheral modes on each device AND the most important, if two devices want to find each other, either the screen must be turned on.
There is a technique (It’s likely a trick) to get over this issue, is that scheduling periodically to push notifications to your iOS devices, which immediately turn the screen on so that the Central can discover nearby Peripherals.
While the app is in background, it performs differently than when it is in the foreground. One of them is the frequency of advertising packets to be sent may decrease. As a result, a Scanner in background finds nearby peripherals is slower compared to when it is in foreground.
Conclusion
Congratulation! We walked through a tutorial to get a deeper view of how CoreBluetooth on iOS works in both Central and Peripheral modes. Hope you find this post interested!
If you have any comments, feel free to send me an email to uynguyen.itus@gmail.com or leave your questions on the comment box.
Made with love.