Bluetooth Integration with App Clips: A How-To Guide
Nowadays, users demand quick and easy access to services they need, without downloading the full version of an app. App Clips - a feature introduced by Apple on iOS 14 - offers a solution to this demand by enabling users to access a small part of an app. By integrating your Bluetooth-enabled app to App clip, you can take user experience to the next level. This opens up new possibilities, such as allowing users to connect to nearby devices, perform a specific feature, and more. In this tutorial, I’ll guide you through integrating Bluetooth into your App Clip. Whether you’re a seasoned developer or a newbie, you will find everything you need to get started. So, let’s dive in!
App Clips
“An App Clip is a small part of your app that’s discoverable at the moment it’s needed and lets people complete a quick task from your app — even before installing your full app.”. App Clips are designed to be lightweight and fast, providing quick access to your app’s core features and services.
There are many benefits of using App Clips. Firstly, it offers a lightweight part of your app for users to try out an app’s feature without committing to a full download. Secondly, Appclips can be launched through various channels such as NFS tags, QR codes, links from Safari, or Messages.
Here are some use cases and example apps using AppClips:
- Ticketing: AppClip can be used to quickly purchase and access tickets for events such as concerts, movies, or sporting events.
- Ride-requesting: AppClip can be used to easily make a request for a ride service. E.g Lyft.
- Retail: App Clips can be used to quickly access product information, make a purchase, or redeem a coupon at a retail store
- Food ordering: users can quickly access the restaurant’s menu and place an order. E.g: Panera Bread.
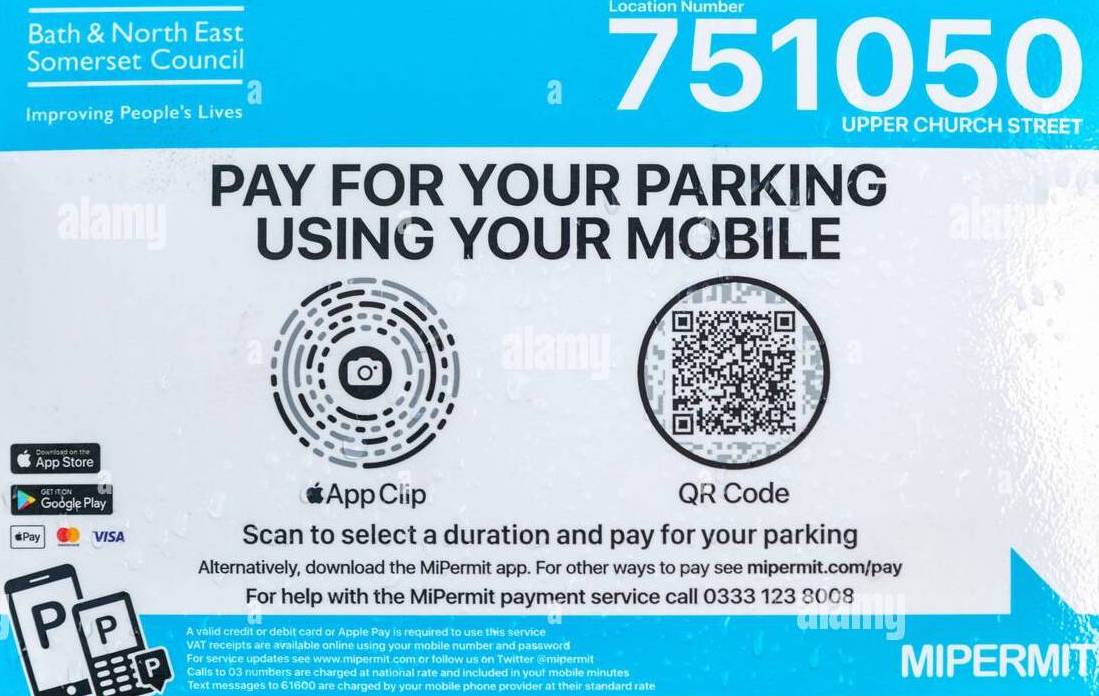
- Parking: Users can simply scan a QR code or tap an NFS tag to launch the Appclipa and pay for their parking spot.
Please be aware that an Apple paid account is required in order to develop an AppClip.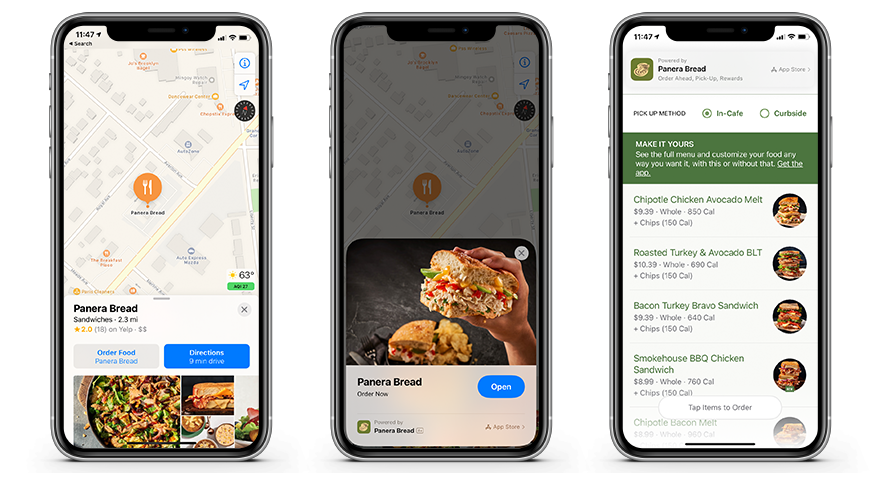
Configuration
Open a hosting
Before launching the App Clip, the system ensures that the App Clip includes its code signature on your website. If you have your own website you can add the following lines to your Apple App Site Association (AASA) on your server and go to the next step.
1 | { |
Firebase Hosting can be a great option for those who don’t have their own server. With Firebase Hosting, you can easily configure your site without any cost as it provides a free tier for hosting.
Install the Firebase command-line tool via the following command
sudo npm install -g firebase-toolsNext, log in to your Firebase account
firebase login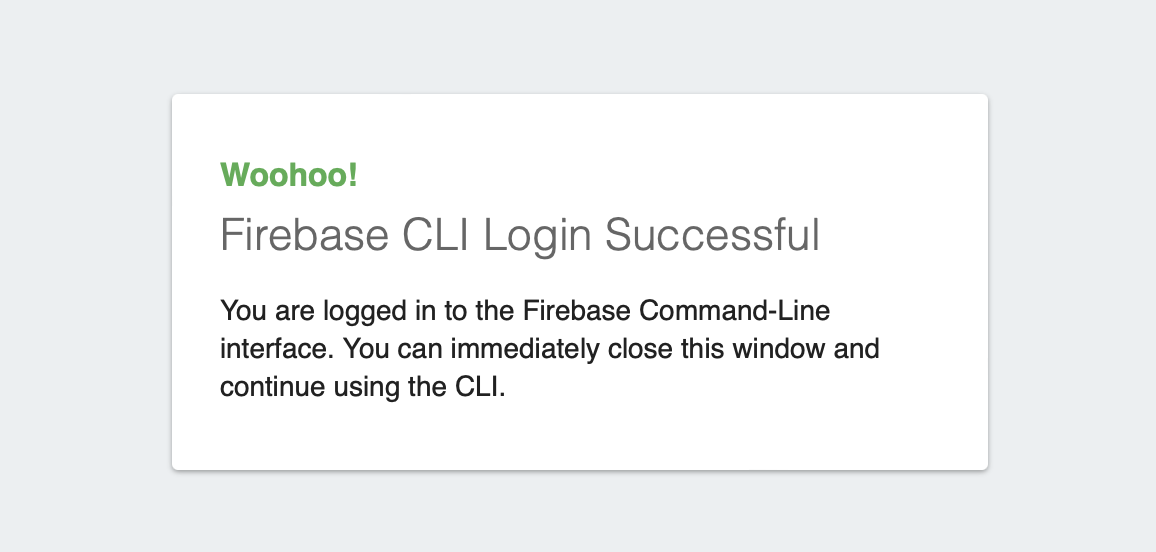
After successfully logging in, navigate to the directory that contains the file you want to upload, and then run
firebase initto select thehostingoption.Add the following lines to
firebase.jsonfile.1
2
3
4
5
6
7
8
9
10
11
12
13
14...
"headers": [
{
"source": "/.well-known/apple-app-site-association",
"headers": [
{
"key": "Content-Type",
"value": "application/json"
}
]
}
],
"appAssociation": "NONE",
...Next, create
public/.well-known/apple-app-site-associationfile.1
2
3
4
5
6
7{
"appclips": {
"apps": [
"[YOUR_TEAM_ID].[YOUR_APP_CLIP_BUNDLE_ID]"
]
}
}Finally, upload files to firebase
firebase deploy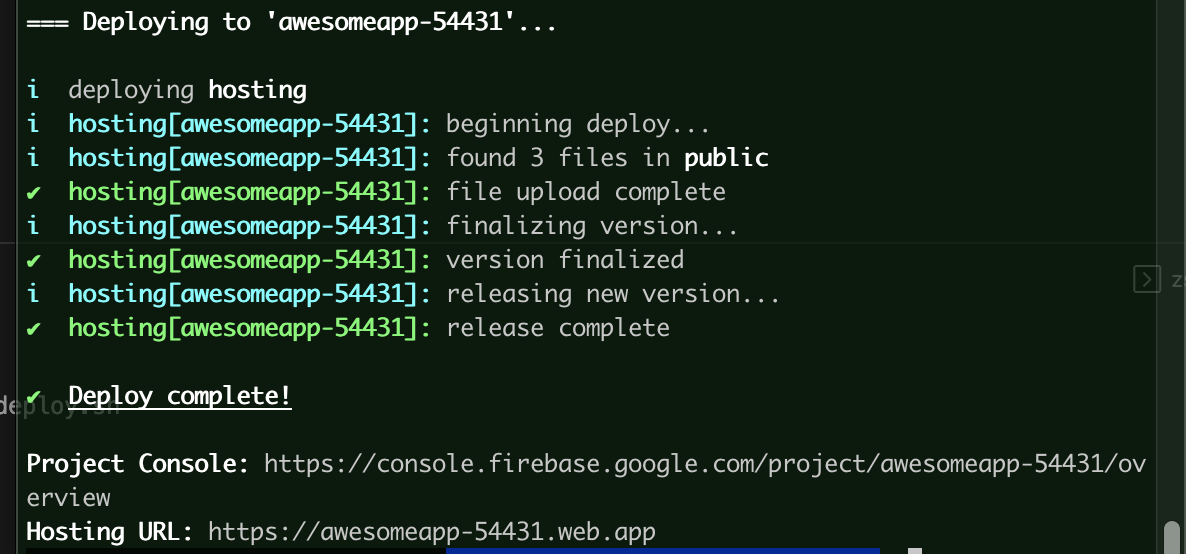
Once the deployment is successful, you will be provided with the URL for your website. This URL will be used to configure the launch of your AppClip.
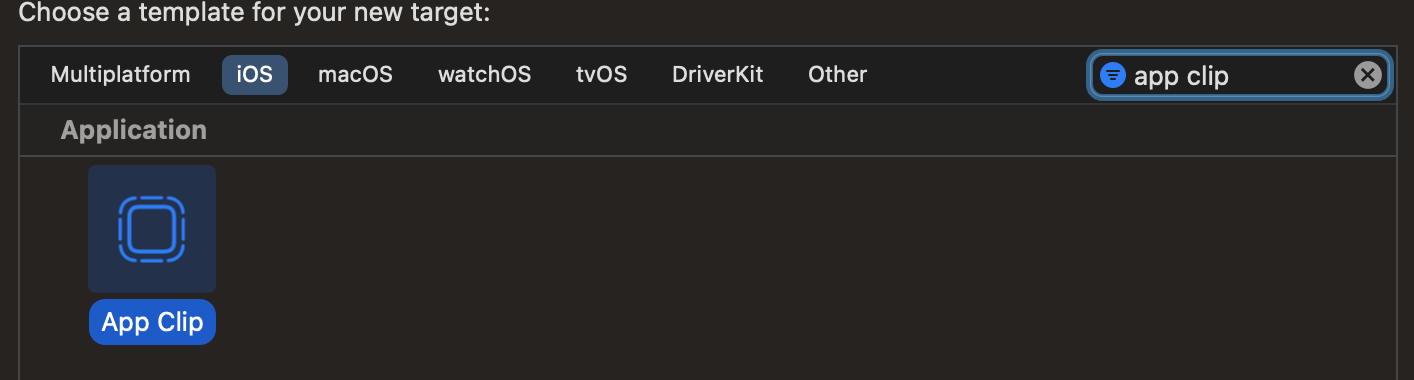
Add Appclip target
First, open your Xcode project and navigate to the File menu. From there, select New and then Target. This will bring up a dialog box that allows you to choose the type of target that you want to create.
Next, select the option for App Clip and click Next. This will take you to a screen where you can configure various settings for your App Clip, such as its name, identifier, and deployment target.
Once you have configured these settings, click Finish to create the new App Clip target. This will add the necessary files and resources to your project and allow you to start developing your App Clip.
To configure your AppClip to launch properly, you will need to follow a few simple steps.
First, select your AppClip target from Xcode, then navigate to Signing & Capabilities and select Associated Domains. From there, you can add your hosting URL to the list of domains that your AppClip is associated with.
For example, let’s say that your hosting URL is awesomeapp-54431.web.app. In this case, you would add appclips:awesomeapp-54431.web.app to the list of domains.
Once you have completed these steps, everything should be set up properly and you can begin implementing your AppClip functions. This may involve writing code to interact with various APIs, designing user interfaces, and more. The exact details will depend on the specific requirements of your AppClip and the features that you want to include.
Implementation
I will develop a very simple application that allows to scan nearby Bluetooth devices and display them on a list when launching the Appclip to demonstrate how to utilize Bluetooth in Appclip. You may modify the application to fit your needs, such as automatically identifying a pre-selected device by address and automatically connecting to the device to execute a specific task.
1 | struct ContentView: View { |
Testing
QR code & NFC
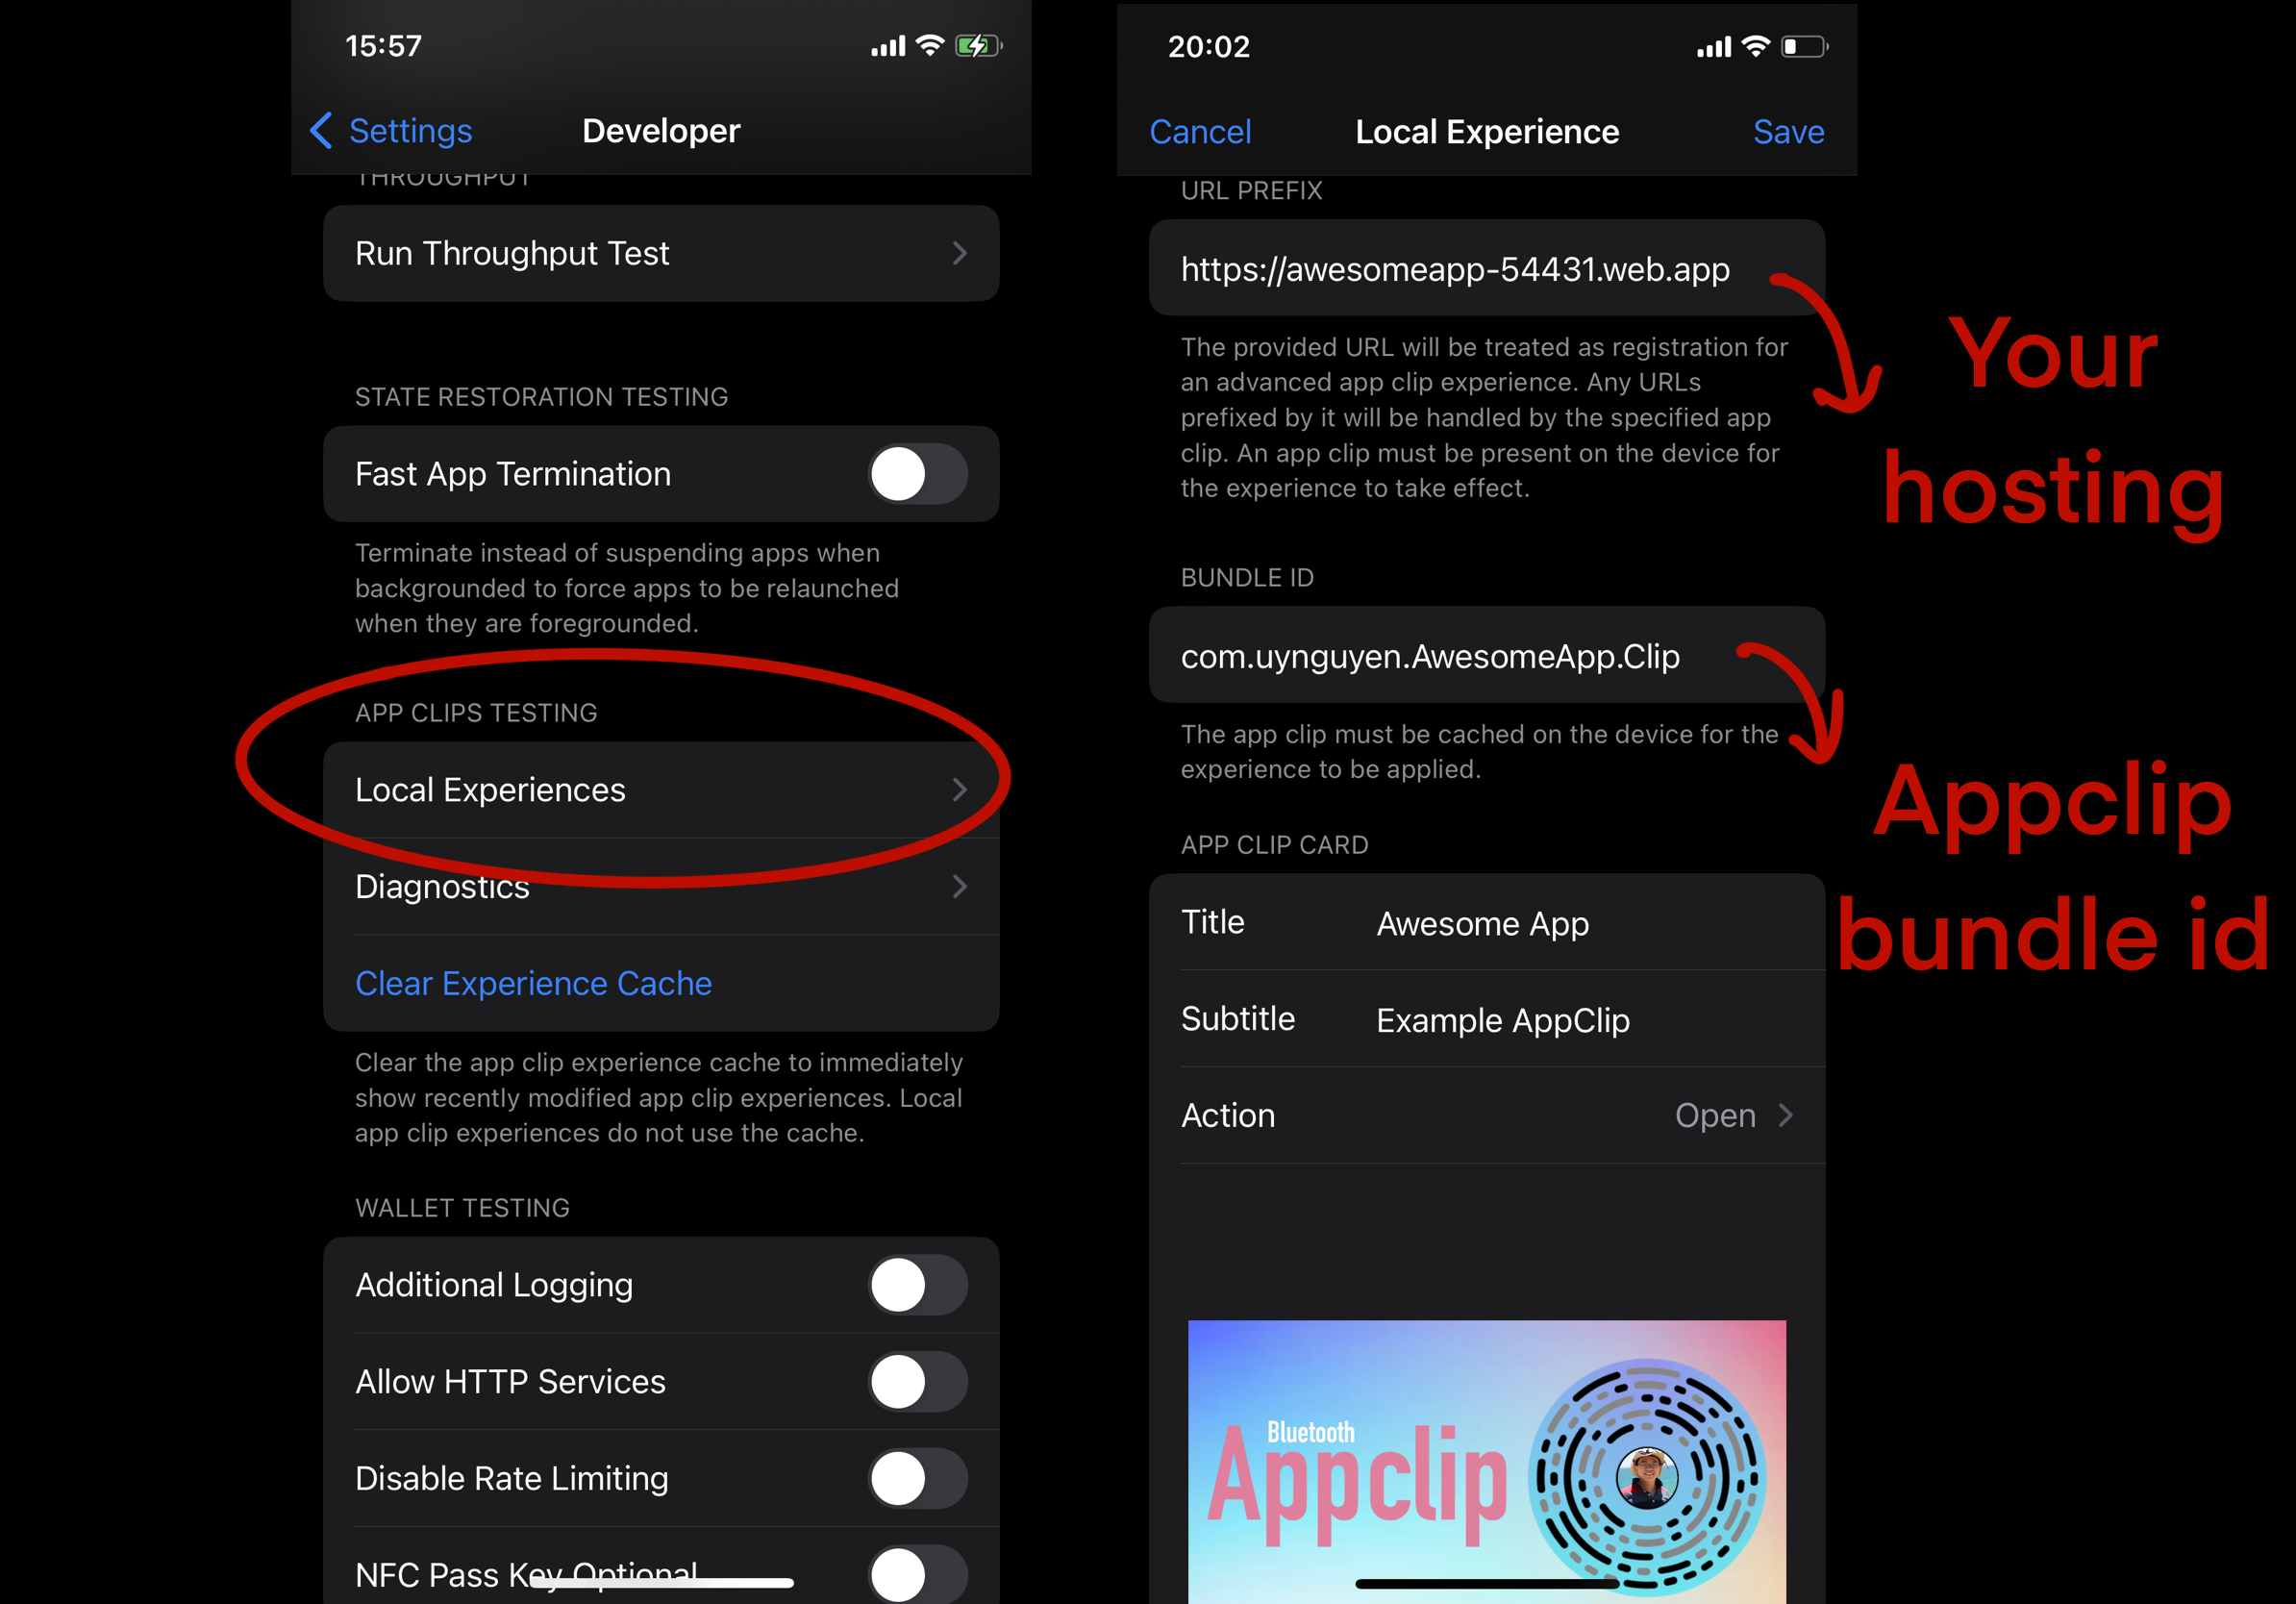
Apple supports testing your Appclip without having to publish it by registering a Local Experience.
To register local experience, go to phone Settings and select Developer. From there, you can access the Local Experiences menu and click on Register Local Experience.
Once you have entered your URL prefix and Bundle ID, you will be able to start filling in the information for your App Clip Card. This is the section that will display to users when they click on the URL or scan the QR code associated with your App Clip.
In the App Clip Card section, you will be able to provide users with important information about your App Clip, including its name, banner, and description. This information should be clear and concise so that users can quickly understand what your App Clip does and how it can be useful to them.
In addition to this, you will also need to select the type of button that you want to use for your App Clip. There are three different types of buttons available: Open, View, and Play.
The Open button is used to launch the App Clip and take users directly to its main interface.
The View button is used to display specific content within the App Clip, such as a particular page or feature.
Finally, the Play button is used to launch a media player within the App Clip, allowing users to listen to music or watch videos.
By following these simple steps and providing users with a clear and engaging App Clip Card, you can help to ensure that your App Clip is successful and well-received by your target audience.
In the video below, you can see a demonstration of how scanning the QR code associated with my website, automatically launch the App Clip and initiate the Bluetooth scanning process for nearby devices. This is a simple example of how App Clips can offer a convenient user experience that eliminates the need for users to navigate through multiple screens or download the full app.
Notes:
- If you find that you no longer need an App Clip that you have previously installed on your iOS device, you can easily remove it by following a few simple steps. Simply go to your Settings and select the App Clips option. From there, you can select the App Clip that you want to remove and click on the option to delete it.
- If you are experiencing issues with your App Clip and it is failing to launch despite being configured correctly, The first things that you should try is invalidating the cache and re-registering your local experiences. This can be done by going to your
Settingsand selecting theDeveloperoption. From there, you can access theLocal Experiencesmenu and click on the option toInvalidate Cache. Once you have done this, you can then re-register your local experiences and try launching your App Clip again.
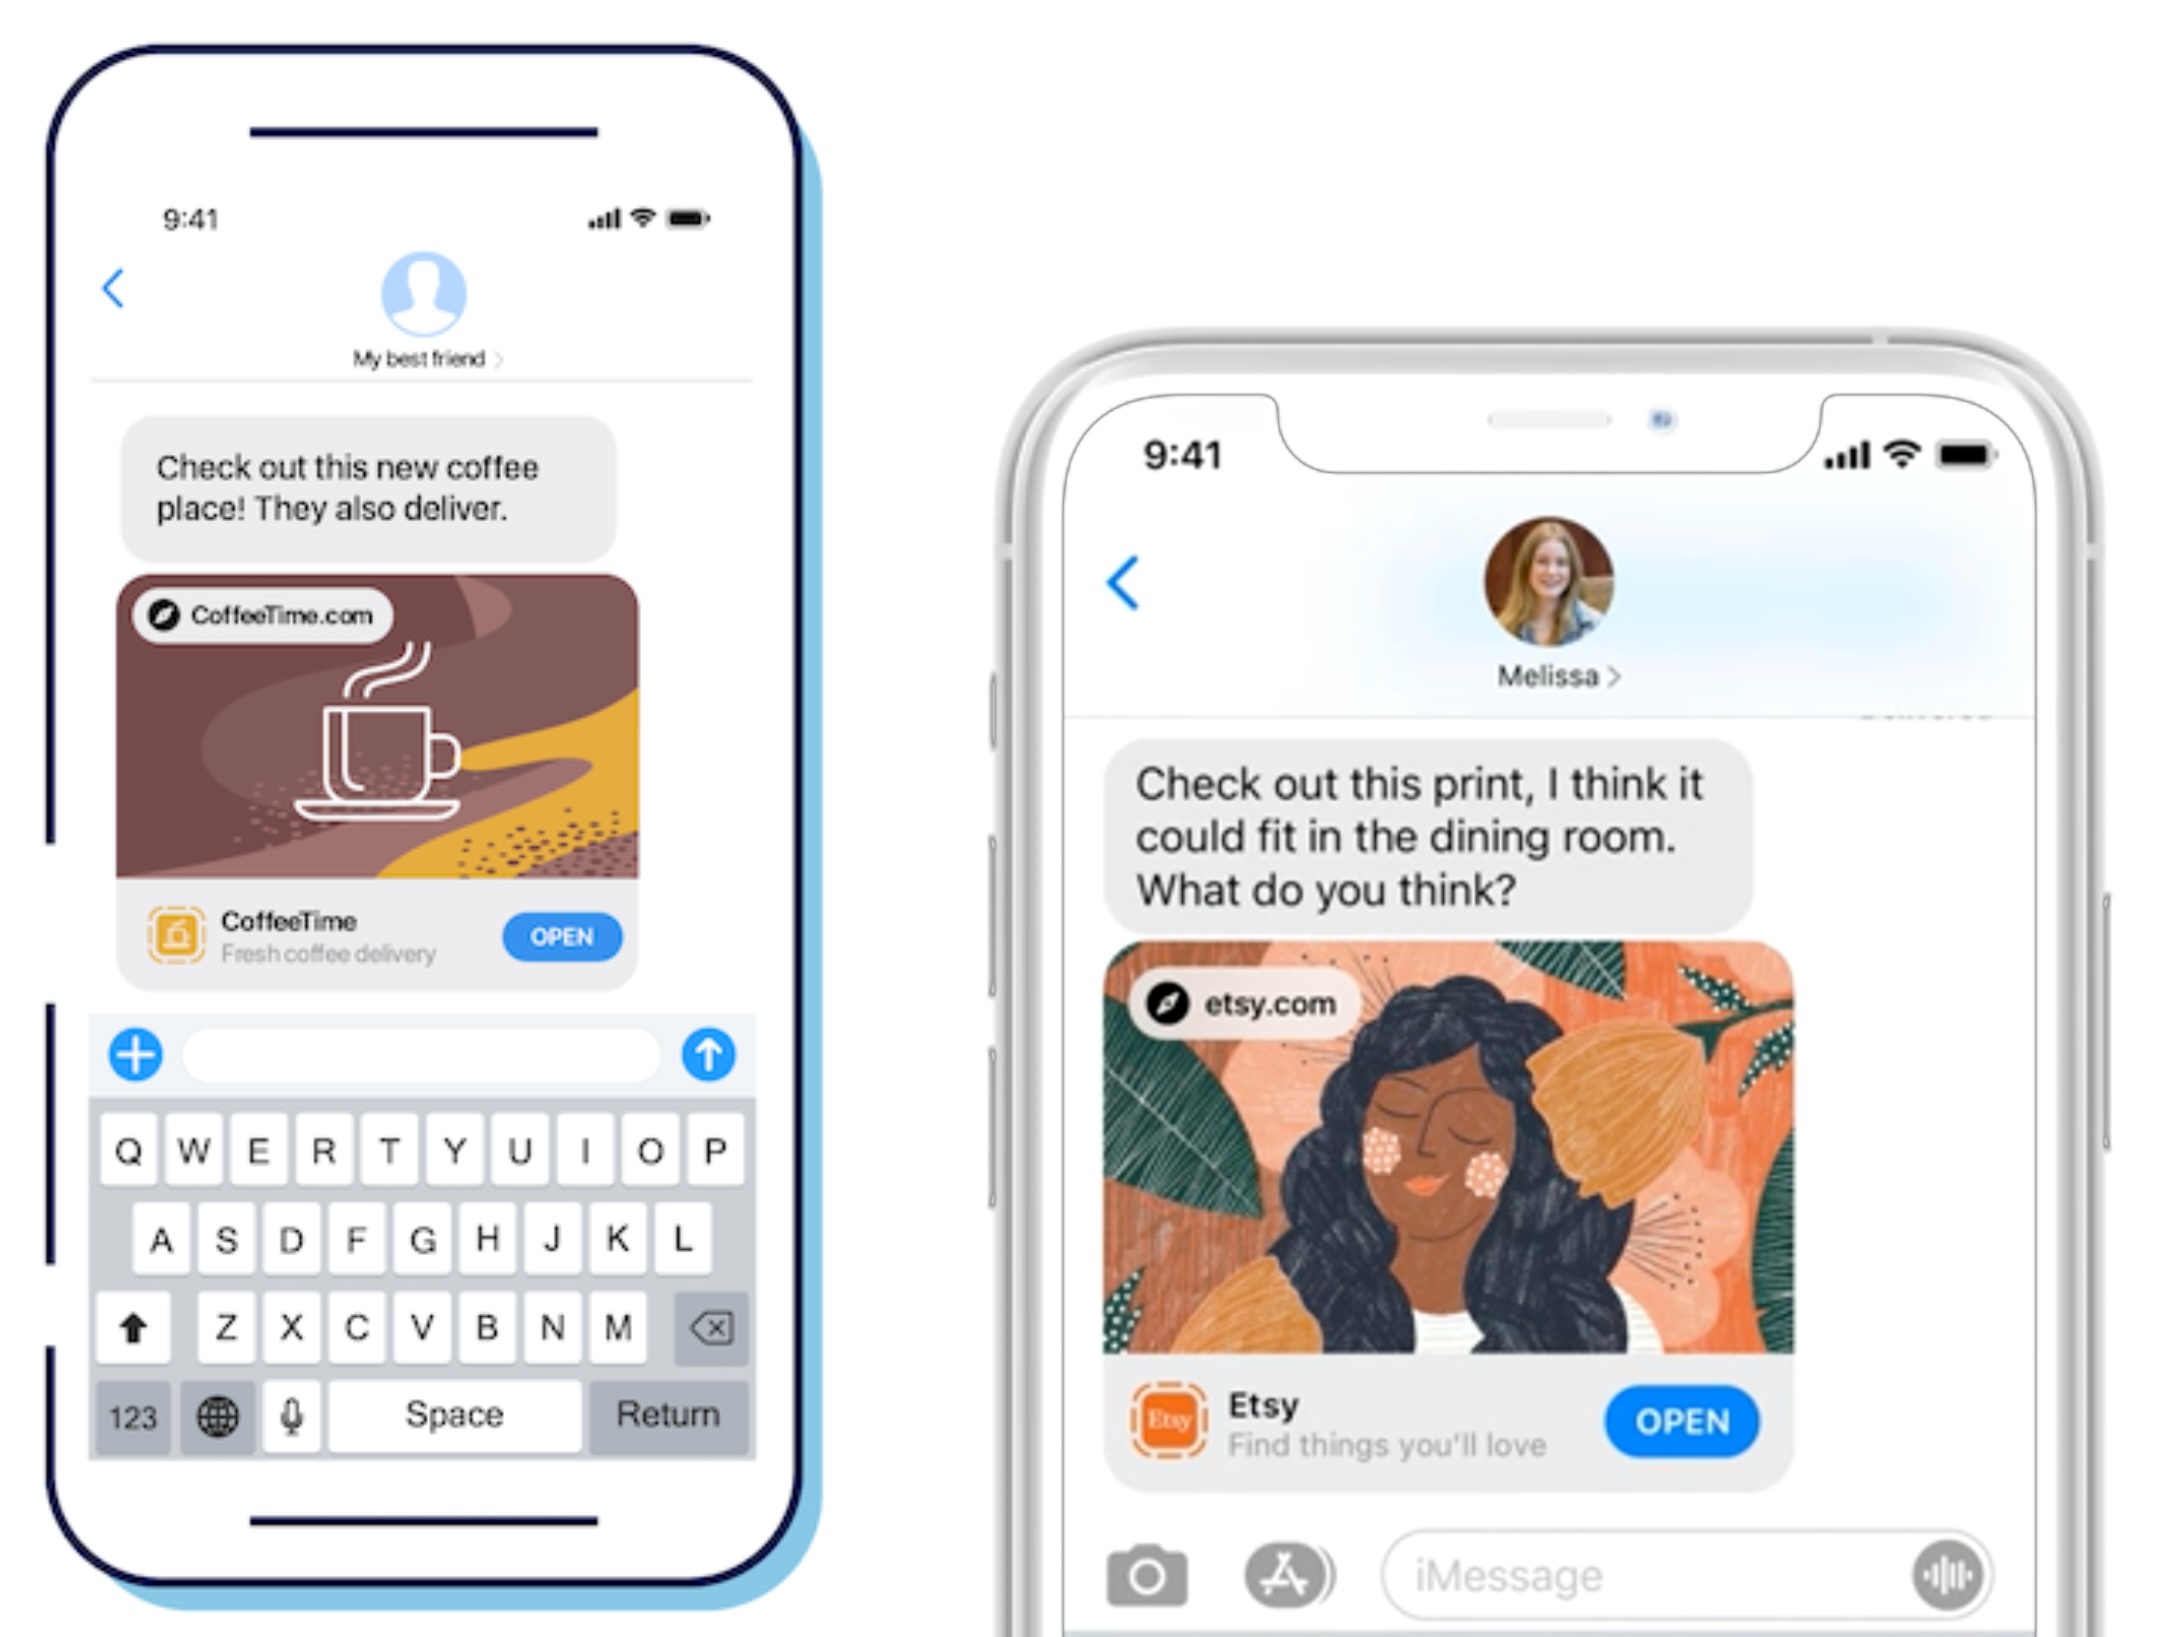
Safari & iMessage
In addition to launching App Clips via QR codes, Apple also offers support for launching your App Clip when a user shares a link to your website through the Messages app, or views the URL on Safari directly. The recipient can tap the link to instantly launch your App Clip to access your App Clip’s functionality quickly and easily.
It’s important to note that Safari’s Smart App Banner and sharing via Messages are only available when the App Clip is published in the App Store.
- App Clip banner on Safari: requires the user’s device runs iOS 15+.
- App Clip banner on iMessage: requires the user’s device runs iOS 14+, and contains the sender as a contact in the Contacts app.
To enable showing Appclip card in Safari and iMessage, config the following lines on your website.
1 | <meta name="apple-itunes-app" content="app-id=YOUR_APP_ID, app-clip-bundle-id=YOUR_APP_CLIP_ID, app-clip-display=card" /> |
Best practice
- Keep it simple: The purpose of an App Clip is to provide a simplified version of your app’s functionality. Focus on providing only the key features that users are most likely to need in the context where they are using the App Clip.
- Optimize for speed: App Clips should be lightweight and fast-loading (Apple requires the size of Appclip must be less than 15MB, this is to ensure that App Clips can be quickly downloaded and launched, even on slower network connections.) to ensure that users can quickly access the functionality they need. Minimize the amount of content and assets that are loaded to ensure that the App Clip loads quickly and doesn’t consume too much data.
- It’s important to keep the number of parameters to a minimum and make sure they’re easy to understand. The more complex the parameters, the more difficult it will be for users to know how to use them.
- Limit the length of parameters: It’s best to limit the length of parameters to no more than 50 characters. This will help to ensure that users can easily read and understand the parameters.
- Validate parameters: Make sure that your App Clip validates all parameters that are passed to it. This will help to ensure that your App Clip functions properly and that users are not able to exploit any vulnerabilities.
- In addition to scanning QR codes, displaying on Safari, and sharing via iMessage, Apple offers several other methods to launch App Clips, such as tapping a link in the Maps app, location-based suggestions from Siri Suggestions, and NFC tags. To ensure that users can easily discover your App Clip, it is important to leverage the appropriate launch method and optimize for discoverability. By doing so, you can increase the chances of users finding and engaging with your App Clip.
Next step
In the upcoming tutorial, I will provide you with detailed instructions on how to publish your App Clip and configure it to run on Safari, Maps, and iMessage. However, please note that App Clips can only be launched when they are published in the App Store. Therefore, I cannot demonstrate the process until my App Clip passes Apple’s review process. 😝
Conclusion
In conclusion, App Clips offer a great opportunity to enhance user experience and simplify the app interaction process. With App Clips, users can quickly access a specified feature without the need to download the full application. This can be particularly useful for users who want to try out your app or have limited data plans or storage. Whether you are a restaurant owner, retail store manager, or any other type of business, you can leverage App Clip to create a better overall experience for your users.
So what are you waiting for? Give App Clips a try and see the difference they can make for your app and your business.