Play Central And Peripheral Roles With CoreBluetooth
Introduction

As I mentioned in the previous post, CoreBluetooth allows us to create applications that can communicate with BLE devices such as heart rate monitors, body sensors, trackers, or hybrid devices.
There are two roles to play in the CoreBluetooth concepts: Central and peripheral.
- Central: Obtain data from peripherals.
- Peripheral: Publish data to be accessed by a central. We can make a Bluetooth device plays as a peripheral from either firmware-side or software-side.
In this post, I will show you how to create a peripheral by using our own identifiers. Also using another device, as a central, to connect and explore our services. Let’s get it started.
Set up a Peripheral
To create a service, you need to have a unique identifier called UUID. A standard service has a 16-bit UUID and a custom service has a 128-bit UUID. Go ahead and type the following command to generate a unique uuid from your terminal.
1 | $ uuidgen |

As you can see, the command returns an uuid in hexa format (128 bit): A56E51F3-AFFE-4E14-87A2-54927B22354C. We will use this string to set up our own service.
1 | class ViewController: UIViewController, CBPeripheralManagerDelegate { |
Here is what these methods do:
- [1] You create an instance of
PeripheralManagerclass, which will play as a peripheral in our example. Note that there is aqueueparam in the constructor. The events of the peripheral role will be dispatched on the provided queue. If we passnil, the main queue will be used. - [2] To set up a service, we need to create an instance of
CBUUIDclass. The constructor gets a unique uuid as a param, which differentiates our service among others. - [3] We create an instance of
CBMutableServiceclass. The constructor receives two params: The first one is our unique uuid, which was defined at [2]; the second param indicates that whether our service is primary or not. If not, our service will not be found when the app is in the background.
Note that you can add services as many as you want. To be simple, I only create one service in this post.
OK, let’s move to the next step. We will define characteristics for our service by using the below code.
1 | let characteristic = CBMutableCharacteristic.init( |
Here is what’s going on:
- [1] Like a service, a characteristic also needs a unique uuid to be differentiated among others.
- [2] We set up properties for the char. There is a variety of characteristic permissions, but I often use some of them:
- Read: Used for characteristics that don’t change very often, e.g version number.
- Write: Modify the value of the characteristic.
- Indicate and notify: The peripheral continuously notify the updated value of the characteristic to the central. The central does not have to constantly ask for it.
- IndicateEncryptionRequired: Only trusted devices can enable indications of the characteristic value.
For other properties, please refer to Apple document
- [3] The value of the characteristic.
Important note: If you provide a value for a characteristic, the characteristic must be read-only. Otherwise, you will get a run-time exception look like.2018-03-03 12:48:32.938615+0700 Peripheral[4238:3046876] *** Terminating app due to uncaught exception 'NSInternalInconsistencyException', reason: 'Characteristics with cached values must be read-only'
Therefore, you must specify the value to be nil if you expect the value to change during the lifetime of the published service (write).
- [4] All characteristic should include the “readable” permission so that centrals could read its value. If we want a central can send commands to peripherals, we need to set the “writeable” permission to the characteristic.
Now we have one service and one characteristic. Let’s publish it.
1 | self.service?.characteristics = [] |
After adding a service to the peripheral manager, the delegate method peripheralManager(_ peripheral: CBPeripheralManager, didAdd service: CBService, error: Error?) will be called.
1 | func peripheralManager(_ peripheral: CBPeripheralManager, didAdd service: CBService, error: Error?) { |
We’re almost done, just one more step: Start advertising the peripheral so that it can be found by other centrals.
1 | peripheralManager.startAdvertising([CBAdvertisementDataLocalNameKey: "TiTan", |
After advertising, the delegate method peripheralManagerDidStartAdvertising will be triggered to indicate whether the peripheral did advertise successfully or not.
1 | func peripheralManagerDidStartAdvertising(_ peripheral: CBPeripheralManager, error: Error?) { |
At this point, we’ve already defined and published our service(s). From now on, the peripheral can be discovered by centrals via CoreBluetooth.
Set up a Central
First, we need to create an instance of the CBCentralManager class.
1 | class ViewController: UIViewController, CBCentralManagerDelegate, UITableViewDelegate, UITableViewDataSource, CBPeripheralDelegate { |
Like a peripheral manager, there is a queue param in the constructor. The events of the central role will be dispatched on the provided queue. If we pass nil, the main queue will be used.
We need to wait for the central manager to be ready, then we will start scanning nearby devices.
1 | func centralManagerDidUpdateState(_ central: CBCentralManager) { |
If it find a peripheral, the delegate method func centralManager(_ central: CBCentralManager, didDiscover peripheral: CBPeripheral, advertisementData: [String : Any], rssi RSSI: NSNumber) will be called.
1 | func centralManager(_ central: CBCentralManager, didDiscover peripheral: CBPeripheral, advertisementData: [String : Any], rssi RSSI: NSNumber) { |
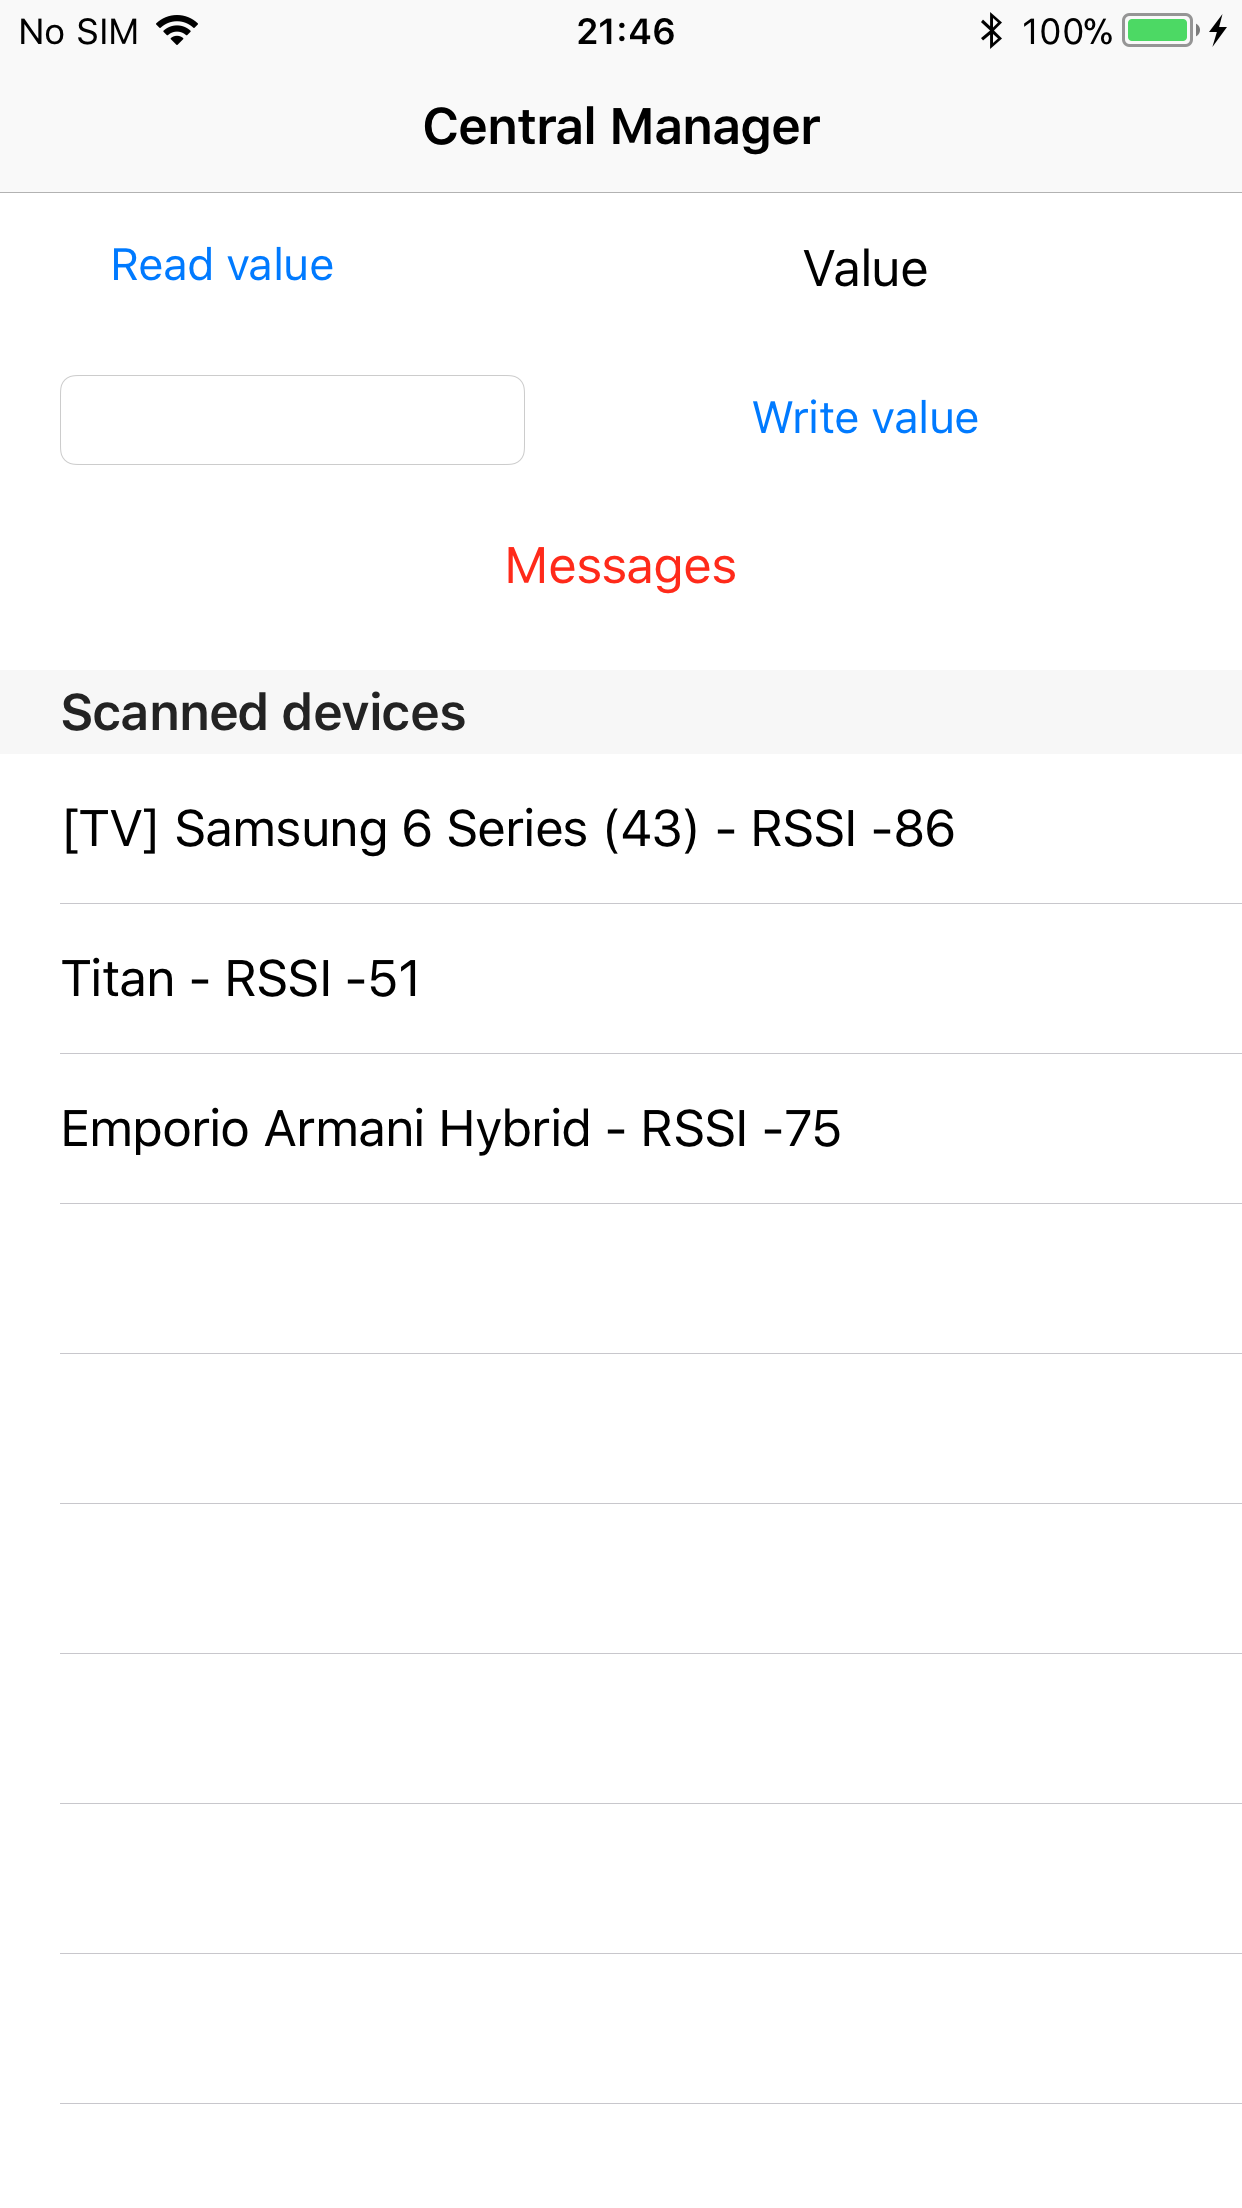
Inside the method, we will check if the peripheral is valid, after that we will add it to the current list, then reload the table view. Note that the RSSI value represents the strength of the transmitting signal. We can estimate the current distance between the central and the peripheral based on the value. The greater the value, the closer the device is.
Build and run the project, you will see the list of discovered devices like this.
Now, let’s connect to our peripheral (The “Titan” device) by clicking on the corresponding row.
Once a connection is made successfully, the delegate method func centralManager(_ central: CBCentralManager, didConnect peripheral: CBPeripheral) will be called. Otherwise, the method centralManager(_ central: CBCentralManager, didFailToConnect peripheral: CBPeripheral, error: Error?) will be triggered.
1 | func centralManager(_ central: CBCentralManager, didConnect peripheral: CBPeripheral) { |
1 | centralManager(_ central: CBCentralManager, didFailToConnect peripheral: CBPeripheral, error: Error?) { |
Notice that after connecting to the peripheral, we need to discover the services of the peripheral to use it ([1]).
The delegate method func peripheral(_ peripheral: CBPeripheral, didDiscoverServices error: Error?) will be called after discovering services.
1 | func peripheral(_ peripheral: CBPeripheral, didDiscoverServices error: Error?) { |
We did not finish yet =.= After discovering services, we also need to discover all characteristics of the services at [1].
Like others, the method func peripheral(_ peripheral: CBPeripheral, didDiscoverCharacteristicsFor service: CBService, error: Error?) will be called after discovering characteristics for a service.
1 | func peripheral(_ peripheral: CBPeripheral, didDiscoverCharacteristicsFor service: CBService, error: Error?) { |
As you can see, we need to set notify to the characteristic that contains the notify property to receive updates from it. [1]
Finally, we’ve done for setting up a connection between the peripheral and the central. Now let’s explore the data.
Read and write data from peripheral
You have to specify which characteristic you want to read.
1 | self.peripheral?.readValue(for: discovererChars[kCharacteristicUUID]!) |
From the peripheral side, you will receive a read request inside the method
1 | func peripheralManager(_ peripheral: CBPeripheralManager, didReceiveRead request: CBATTRequest) { |
After the peripheral response to read requests, the delegate method func peripheral(_ peripheral: CBPeripheral, didUpdateValueFor characteristic: CBCharacteristic, error: Error?) will be called from the central side.
1 | func peripheral(_ peripheral: CBPeripheral, didUpdateValueFor characteristic: CBCharacteristic, error: Error?) { |
If the value is successfully retrieved, you can access it through the characteristic’s value property, like above.
Sometimes we want to write the value of a characteristic, which is writeable. We can write the value to it by calling the peripheral’s writeValue method like this.
1 | self.peripheral?.writeValue(data, for: discovererChars[kCharacteristicUUID]!, type: .withResponse) |
There is an argument called type, you specify what type of write you want to perform. In the example above, the write type is .withResponse, which instructs the peripheral to let your app know whether or not the write succeeds.
From the peripheral side, you will receive a write request inside the method
1 | func peripheralManager(_ peripheral: CBPeripheralManager, didReceiveWrite requests: [CBATTRequest]) { |
After the write request receives the response, the method peripheral(_ peripheral: CBPeripheral, didWriteValueFor characteristic: CBCharacteristic, error: Error?) will be called.
1 | func peripheral(_ peripheral: CBPeripheral, didWriteValueFor characteristic: CBCharacteristic, error: Error?) { |
Encypted characteristic values
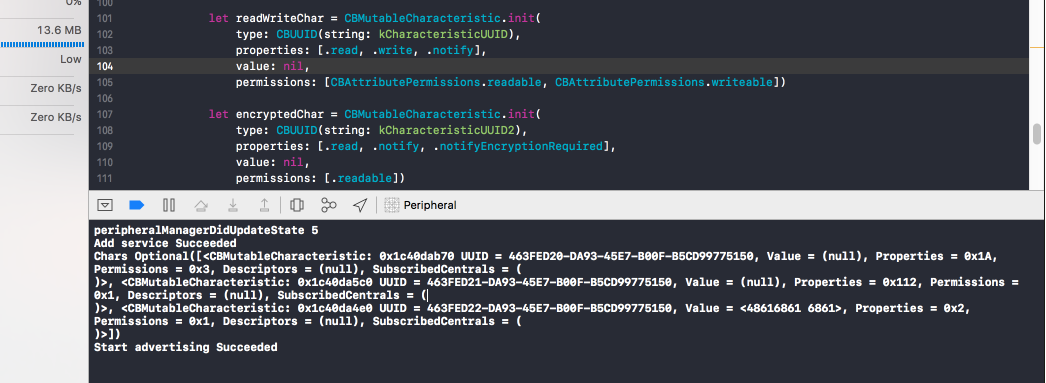
Sometimes we want to secure sensitive data. We can config the appropriate characteristic properties and permissions. Something like this
1 | let encryptedChar = CBMutableCharacteristic.init( |
By doing this way, we ensure that only trusted devices have permissions to access these data.
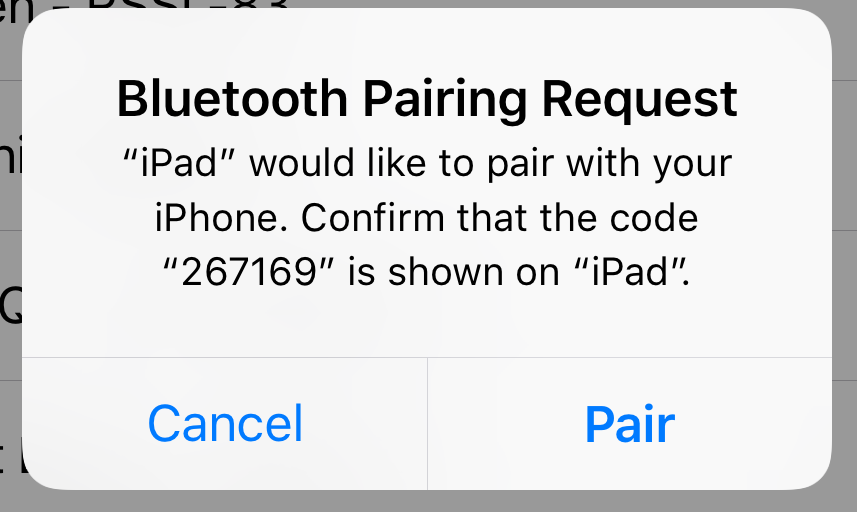
In my example, once a connection is made, CoreBluetooth tries to pair the peripheral (iPad) with the central (iPhone) to create a secure connection. Both devices will receive an alert indicating that the other device would like to pair. After paring, the central can access to the encrypted characteristic values of the peripheral.
Some important notes
- The client-server model of BLE is called a publish and subscribe model.
- The peripheral only consumes power when it’s advertising its services, or receiving or responding to a central’s request.
- You can pass a list of service UUIDs inside the
scanForPeripheralsmethod. When you specify a list of service UUIDs, the central manager returns only peripherals that advertise those services, allowing you to scan only for devices that you may be interested in. - You need to grant permissions to let your app uses Bluetooth LE accessory, and acts as a Bluetooth LE accessory for peripheral sides. (Go to project -> Capabilities for setting).
- You also need to add one more information property to your info.plist, let’s add an entry with key
Privacy - Bluetooth Peripheral Usage Descriptionand valueApp communicates using CoreBluetooth(Or whatever you want to describe).
A quick look to my app
Let’s try some light exercise from my example.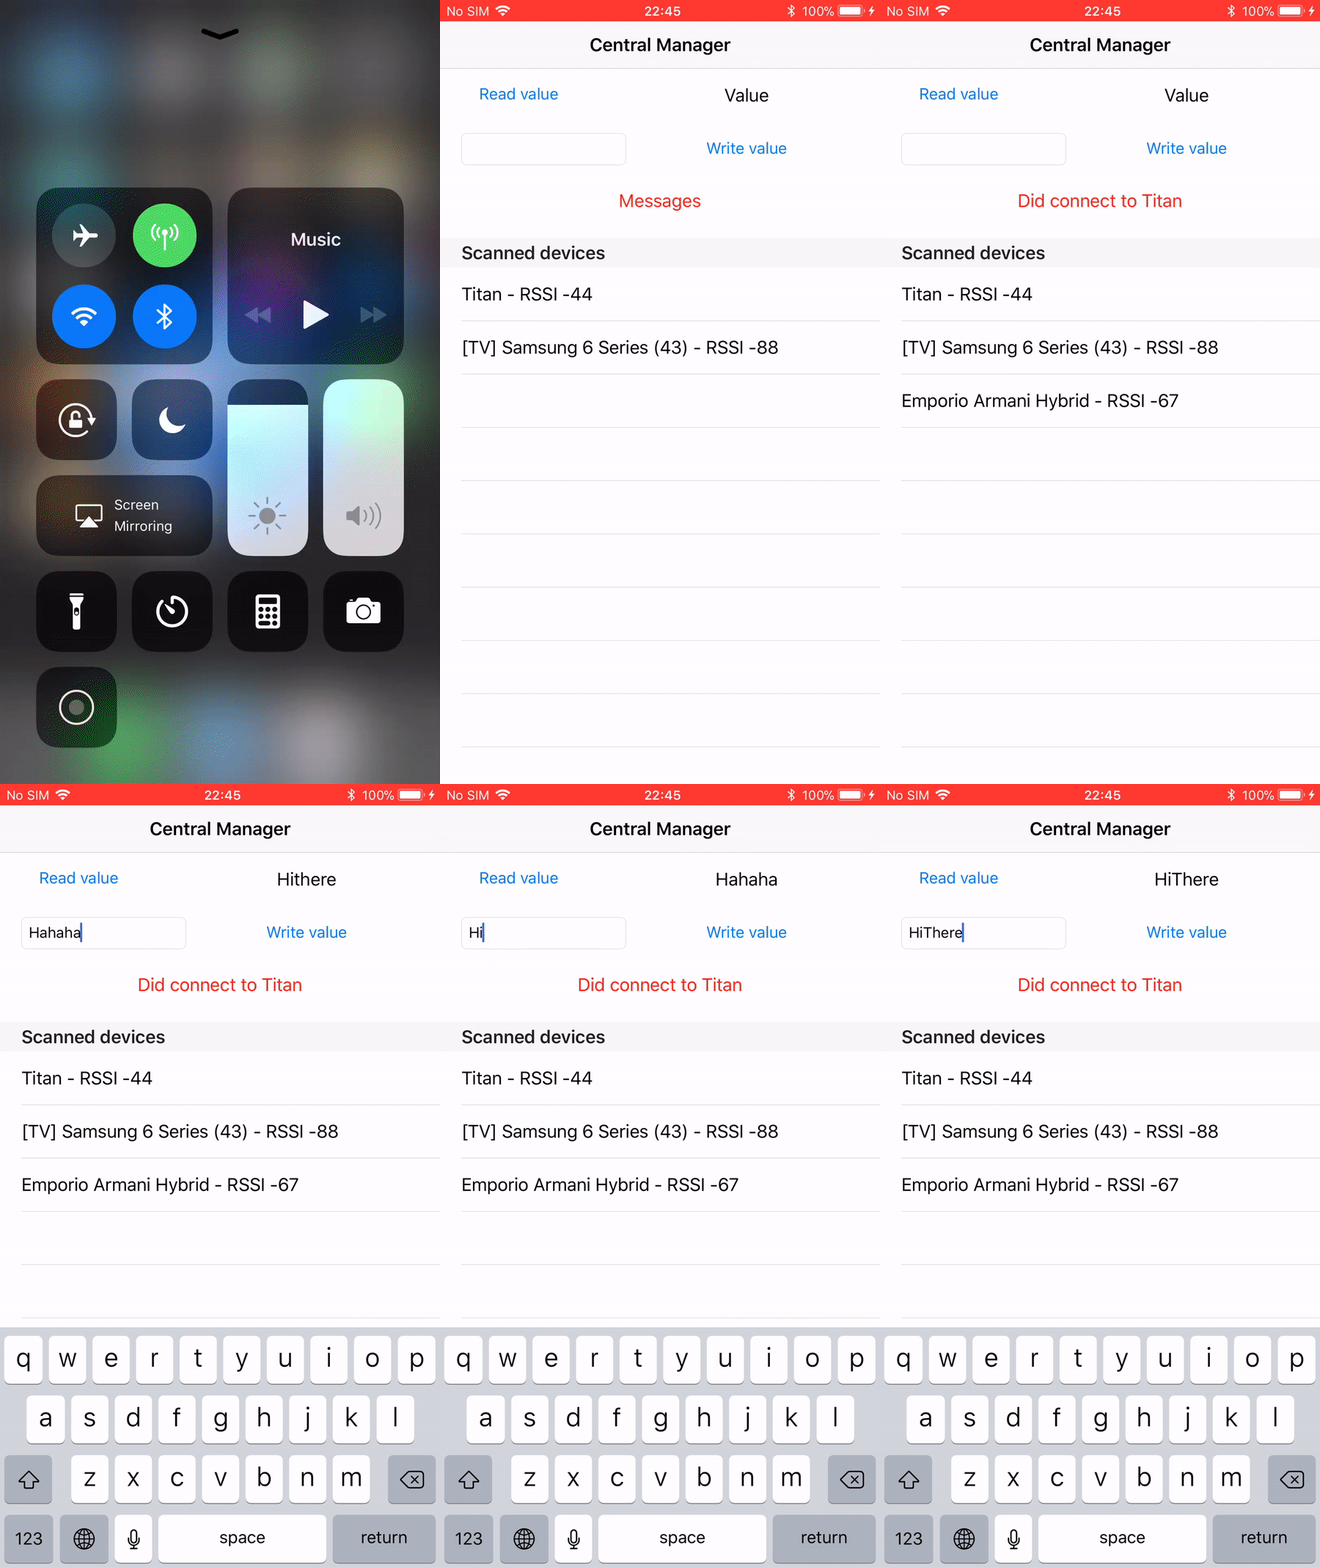
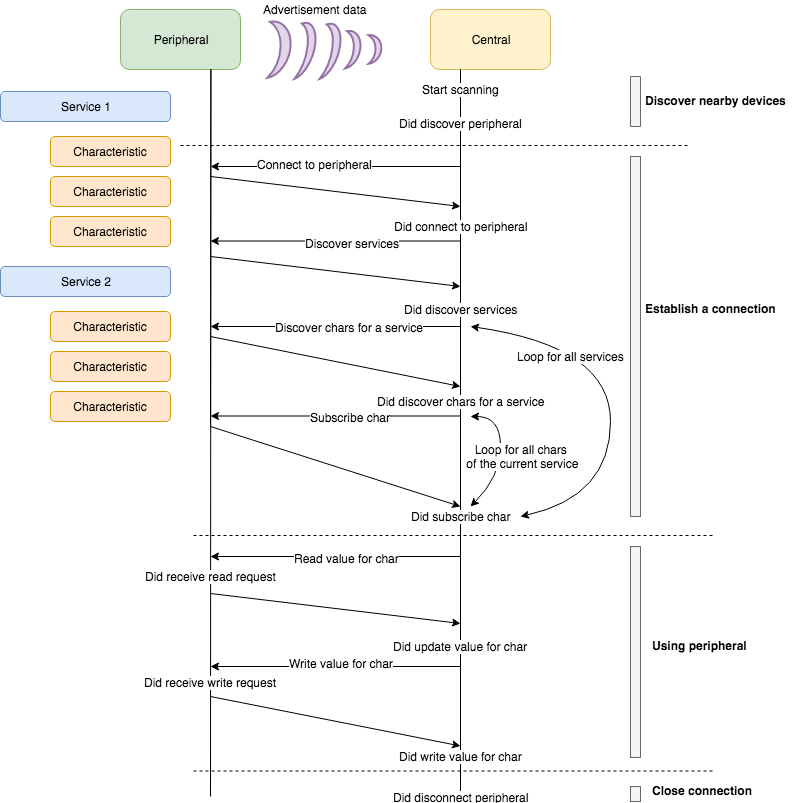
Summarize the programming flow for BLE
To summarize the general programming workflow of CoreBluetooth on iOS, please take a look at the picture below.
Final thoughts
In this post, I guided you how to use the CoreBluetooth to create a peripheral as well as how to create a central to connect and obtain data from a peripheral. In the future, we can see that all devices around us are connected together via Bluetooth, towards the IoT world.
You can download the completed project of the central here or the peripheral here.
If you have any questions or comments, feel free to leave it on my post. Any comments are welcome.